
In “Mold Removal: A Step-by-Step Process,” you’ll discover the key steps to effectively remove mold from your home. From identifying the problem areas to safely eliminating the mold and preventing future growth, this article provides you with a comprehensive guide to tackling this common issue. No matter the severity of the mold infestation, you’ll be equipped with the knowledge and resources to address it promptly and restore a healthy living environment. Additionally, if you require professional assistance, SERVPRO of West Pensacola is recommended, offering their expertise in mold removal services. Don’t let mold take control of your home, take action today with this informative article.
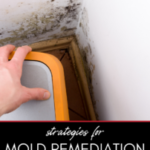
Mold Removal: A Step-by-Step Process
Mold growth in your home can be a cause for concern as it not only damages your property but also poses health risks. To effectively tackle a mold problem, it is important to follow a systematic and comprehensive approach. In this article, we will guide you through the step-by-step process of mold removal, ensuring that you address the issue thoroughly and prevent its recurrence in the future.

Step 1: Assessing the Mold Problem
Identify the areas affected by mold
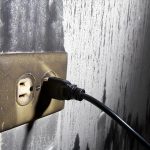
The first step in mold removal is to identify the areas in your home that are affected by mold growth. Common areas prone to mold infestation include bathrooms, basements, attics, and areas with a high level of moisture. Inspect these areas carefully, paying attention to discoloration, musty odors, and visible mold patches.
Determine the extent of mold growth
After identifying the affected areas, it is important to assess the extent of mold growth. This will help you understand the scale of the problem and plan your remediation efforts accordingly. If mold is confined to a small area, it may be possible to handle the removal yourself. However, extensive mold growth or mold in hard-to-reach areas may require professional assistance.
Identify the type of mold present
Not all molds are created equal, and some may pose a greater risk to your health than others. Identifying the type of mold present is important for determining the appropriate remediation methods and understanding the potential health hazards. While it is not necessary to conduct a formal mold test, you can consult a mold remediation professional to help you identify the mold type.
Step 2: Containing and Protecting the Area
Isolate the affected area
To prevent the spread of mold spores to other parts of your home, it is crucial to isolate the affected area. Close all doors and windows leading to the area and use plastic sheeting to seal off any openings. This containment measure helps minimize the risk of cross-contamination during the mold removal process.
Seal off air vents and ducts
Mold spores can easily travel through your HVAC system, leading to mold growth in other areas of your home. To prevent this, it is important to seal off air vents and ducts in the vicinity of the mold-infested area. Use plastic sheeting and duct tape to create an airtight seal, ensuring that no air can circulate from the contaminated area to the rest of your home.
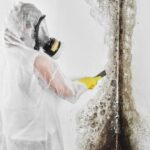
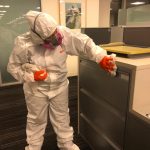
Wear protective clothing and equipment
Mold can be hazardous to your health, especially if you have any existing respiratory conditions or allergies. To protect yourself during the remediation process, it is essential to wear appropriate protective clothing, including gloves, goggles, and a respirator mask. This will help minimize your exposure to mold spores and reduce the risk of health issues.
Step 3: Removing Mold-Infested Materials
Remove porous materials
Porous materials, such as drywall, carpeting, and insulation, are highly susceptible to mold growth and should be removed if they are infested. These materials can absorb and retain moisture, providing an ideal environment for mold to thrive. Properly disposing of mold-infested porous materials is crucial to prevent the spread of mold spores and eliminate the source of the problem.
Bag and dispose of contaminated items
Any items that cannot be salvaged, such as mold-infested clothing, furnishings, or personal belongings, should be placed in sealed plastic bags and disposed of properly. This prevents the spread of mold spores during transportation and ensures that contaminated items do not reintroduce mold into your home.
Clean non-porous materials
Non-porous materials, such as metal, glass, and hard plastic, can often be salvaged and effectively cleaned. Use a mixture of water and detergent to scrub the mold-infested surfaces, ensuring that you thoroughly remove all visible mold. After cleaning, apply an EPA-approved moldicide to further disinfect the area and prevent mold regrowth.
Step 4: Killing and Preventing Mold Regrowth
Apply an EPA-approved moldicide
Once the affected materials have been removed and the area has been thoroughly cleaned, it is important to apply an EPA-approved moldicide. This helps kill any remaining mold spores and prevent further mold growth. Follow the manufacturer’s instructions carefully and ensure that you cover all surfaces, paying extra attention to areas that were heavily infested.
Treat affected surfaces
In addition to using a moldicide, it is important to treat affected surfaces to ensure that mold will not regrow. This may involve applying special coatings or sealants that create a barrier against moisture and mold. Consult a mold remediation professional for recommendations on the most effective products and methods for treating your specific surfaces.
Install mold-resistant materials
To further prevent mold regrowth, consider replacing any removed materials with mold-resistant alternatives. For example, using mold-resistant drywall, insulation, or carpeting can help reduce the risk of future mold problems. These materials are designed to resist moisture and inhibit mold growth, providing an added layer of protection for your home.
Step 5: Cleaning and Sanitizing the Area
Vacuum with HEPA filters
After the mold removal process, it is important to carefully clean the area to remove any remaining mold spores. Use a vacuum cleaner equipped with HEPA filters to effectively capture small particles, including mold spores, and prevent them from becoming airborne. Vacuum the entire area, paying special attention to floors, walls, and other surfaces.
Wipe down surfaces with antimicrobial solutions
To further sanitize the area and eliminate any remaining mold spores, wipe down all surfaces with antimicrobial solutions. These solutions are specifically designed to kill mold and prevent its regrowth. Ensure that you thoroughly cover all areas, including hard-to-reach corners and crevices.
Use air scrubbers
To improve air quality and remove any lingering mold spores in the atmosphere, consider using air scrubbers. These devices work by filtering and purifying the air, capturing mold spores and other contaminants. Running an air scrubber for a period of time after the mold removal process can help ensure that the air in your home is clean and safe to breathe.
Step 6: Drying and Dehumidifying
Use dehumidifiers
Moisture control is essential in preventing mold growth. After the mold removal process, use dehumidifiers to reduce the humidity level in the affected area. Dehumidifiers extract excess moisture from the air, creating an environment that is less conducive to mold growth. Monitor the humidity levels regularly and adjust the dehumidifier settings accordingly.
Monitor moisture levels
It is important to monitor moisture levels not only during the mold removal process but also on an ongoing basis. Check for any signs of increased moisture or water leaks in your home, as these can contribute to mold growth. Take prompt action to address any issues and ensure that your property remains dry and properly ventilated.
Ensure proper ventilation
Proper ventilation plays a vital role in preventing mold growth. Ensure that your home has adequate ventilation in areas prone to moisture, such as bathrooms, kitchens, and laundry rooms. Consider installing exhaust fans or opening windows to improve airflow and reduce the accumulation of moisture. Good ventilation helps remove excess humidity and promotes a healthier indoor environment.
Step 7: Conducting Post-Remediation Verification
Inspect for any remaining mold
After completing the mold removal process, conduct a thorough inspection of the treated area to ensure that no mold is left behind. Check for any signs of new mold growth or areas that may have been missed during the cleaning process. If you identify any issues, promptly address them to prevent further mold problems.
Perform air quality testing
To provide an extra level of assurance, consider conducting air quality testing after mold remediation. This involves collecting air samples and analyzing them in a laboratory to determine the level of mold spores in your home. Air quality testing can help verify the effectiveness of the mold removal process and provide valuable information for future prevention efforts.
Issue a clearance certificate
If the inspection and air quality testing indicate that the mold problem has been properly remediated, consider obtaining a clearance certificate. This document serves as proof that your home has been successfully treated for mold and can provide peace of mind to potential buyers or tenants if you decide to sell or rent your property in the future.
Step 8: Addressing the Root Cause of Mold
Identify and fix water leaks
To prevent mold from returning, it is important to identify and fix any water leaks in your home. Water intrusion is a common cause of mold growth, and even small leaks can create a favorable environment for mold to thrive. Inspect your home for leaks in pipes, faucets, roofs, and windows, and promptly repair any issues to eliminate the source of moisture.
Improve ventilation
Inadequate ventilation can contribute to excess moisture and mold growth. Assess the ventilation system in your home and consider making improvements where necessary. This may involve installing or adjusting exhaust fans, ensuring that air ducts are clean and unobstructed, or adding additional ventilation in moisture-prone areas. By improving ventilation, you can create an environment that is less conducive to mold growth.
Maintain proper humidity levels
Maintaining proper humidity levels is key in preventing mold growth. Ideally, indoor humidity should be kept below 60% to inhibit mold spore germination. Use hygrometers to monitor humidity levels in your home, especially in areas prone to moisture. If the humidity is consistently high, consider using dehumidifiers or other moisture control measures to bring it down to a suitable range.

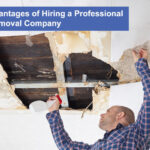
Step 9: Hiring Professional Mold Remediation Services
Benefits of professional assistance
While some mold removal tasks can be tackled on your own, there are several benefits to hiring professional mold remediation services. Professionals have the expertise and experience to effectively identify, contain, and remove mold, ensuring thorough remediation. They also have access to specialized equipment and materials that may not be readily available to homeowners. Hiring professionals can save you time, effort, and potential health risks associated with DIY mold removal.
Choosing a reputable mold remediation company
When choosing a mold remediation company, it is important to do your research and select a reputable and experienced provider. Look for companies that are certified in mold remediation and have positive customer reviews. Asking for recommendations from friends, family, or trusted professionals can also help you find a reliable company. Be sure to request proof of insurance and inquire about their mold removal process before making a decision.
Getting cost estimates
To ensure that you have a clear understanding of the costs involved, it is advisable to obtain cost estimates from multiple mold remediation companies. Request a breakdown of the services included and any additional charges that may apply. Keep in mind that the cost will vary depending on factors such as the size of the affected area, the extent of mold growth, and the complexity of the remediation process.
Step 10: Preventing Future Mold Growth
Keep moisture levels in check
To prevent future mold growth, it is essential to keep moisture levels in your home in check. Regularly inspect areas prone to moisture, such as bathrooms, kitchens, and basements, for any signs of increased humidity or water damage. Address any leaks or water intrusion promptly and ensure that your home remains dry and well-ventilated. By controlling moisture, you can significantly reduce the risk of mold growth.
Regularly inspect and maintain the property
Regular inspections and maintenance can help identify and address any potential mold issues before they become major problems. Check for any signs of water damage, leaks, or areas of high humidity. Keep gutters and downspouts clear of debris to prevent water accumulation near your home. By staying proactive and taking prompt action, you can minimize the risk of mold growth and preserve the integrity of your property.
Implement mold prevention tips
In addition to moisture control and regular maintenance, there are several preventive measures you can implement to reduce the likelihood of mold growth. These include using mold-resistant building materials, such as drywall and insulation, ensuring proper ventilation in moisture-prone areas, and regularly cleaning and drying items prone to mold, such as shower curtains and bath mats. Implementing these tips can help create an environment that is inhospitable to mold.
In conclusion, mold removal requires a systematic and comprehensive approach to ensure effective remediation and prevent its recurrence. By following the step-by-step process outlined in this article, you can confidently tackle mold problems in your home and create a healthier living environment. Whether you choose to handle the mold removal yourself or seek professional assistance, it is crucial to address the root cause of mold and implement preventive measures to minimize the risk of future infestations. Remember, mold removal is not just about eliminating the visible mold; it is about creating a mold-free home where you and your loved ones can thrive.